
It’s hard to believe it has been 4 fantastic years already since we launched Trinity Stamps. Time flys when you are having fun! I have been so blessed to meet so many amazing people on… More

It’s hard to believe it has been 4 fantastic years already since we launched Trinity Stamps. Time flys when you are having fun! I have been so blessed to meet so many amazing people on… More

I am So excited to tell you that Trinity Stamps has finally released another fabulous line of Stamps, Dies, and LOTS of embellishments. There are also lots of new shop items added (plus more coming… More
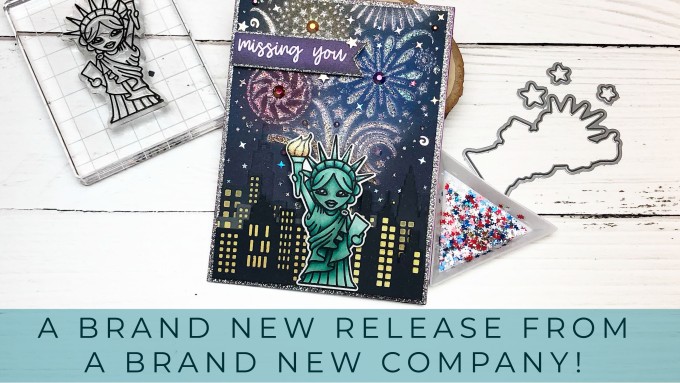
Meet a brand new company with a brand new release! Trinity Stamps!
Hi Friends!
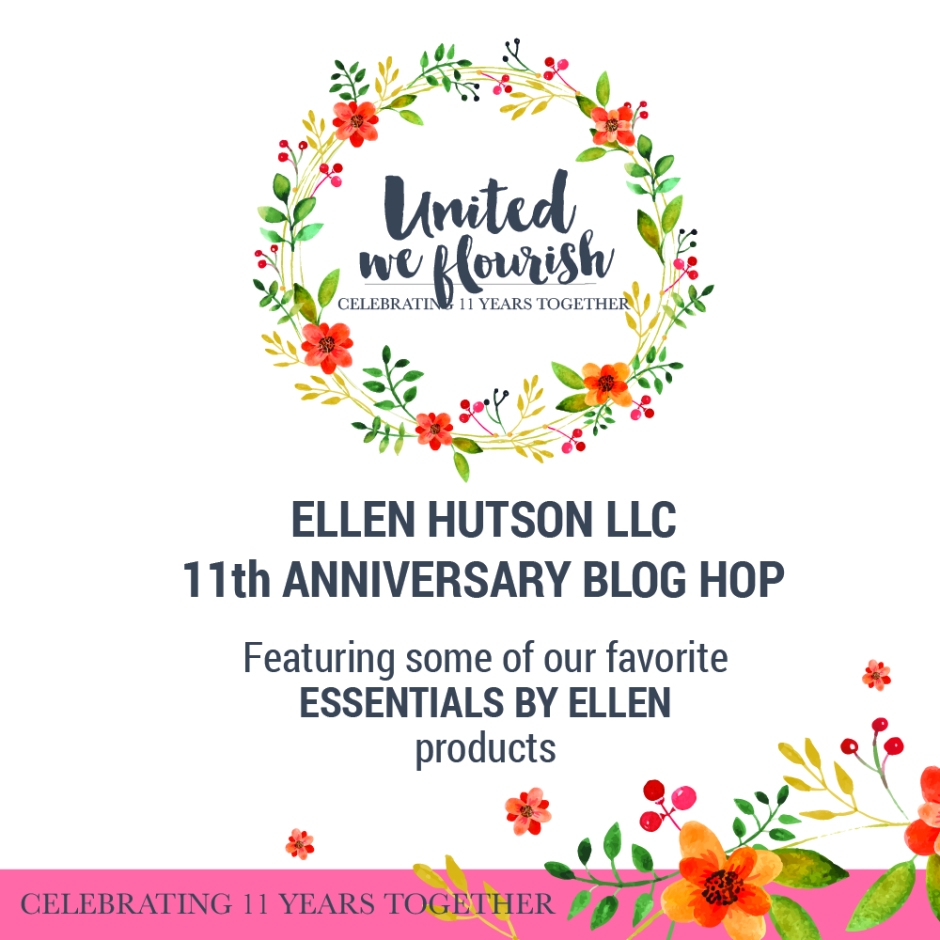
It is one of my favorite companies anniversary, Ellen Hutson is celebrating 11 years in business (YAY! Congrat’s to Ellen and her wonderful and kind staff!) and to celebrate there is a week-long blog hop! If you are already hopping along you will find the next person in the hop at the bottom of the post (as well as the rest of the talented ladies inspiring you today!)
So for our project we are all picking our favorite Essentials by Ellen product and sharing that with you. Let me tell you, Picking my favorite product is like picking a favorite child it simply cannot be done. So, I am cheating a little and sharing one of my favorite stamp sets (and all the cute additions that have come to the essentials by Ellen line that expand it’s use!) All Inside! It all started with my love of this stamp set (and matching die that has cut outs for his hands!):
Here is a look at the All inside stamp set and it’s matching die:


I also used the Bear Ware Stamp set (flowers) which you can see here:

There is also a matching die set to Bear Ware:
And here is my first project using this cute bear!

I kept this card fairly simple. I stamped the floral bunch and added extra flowers to make the bouquet even bigger. Then I inked up the bear, wiped off the excess ink where the flowers were in the way (you could mask this instead if you wanted) and stamped him down. I used versafine sepia ink for the stamping but for the coloring of all the images, I used my Daniel Smith watercolors. The sentiment came from another Essentials by Ellen stamp set called “Lovely“.
Next card I did uses the same All Inside stamp and die set but this time I incorporated the Bear Ware 2 stamp and die set as well as the Warm Fuzzies stamp set:


I also grabbed a couple of stamps and dies from the Leading Ladies: Cozy Lady stamp and die set (coffee cup and leaves). You can find those by clicking HERE.
Here is the Autumn project I did using these fun stamps and dies:
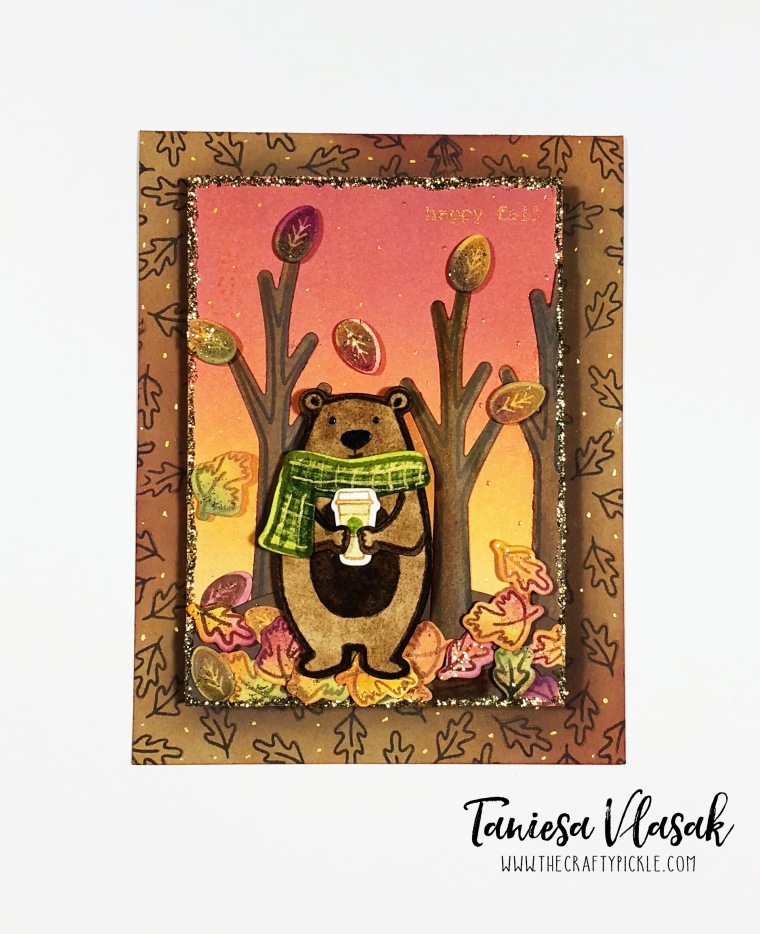
All my stamping and coloring was done with Distress Oxide inks, Versafine Sepia ink, and the scarf and coffee cup were painted with Daniel Smith watercolor paints. I stamped the Happy Fall lightly in the upper corner using the Delicata Golden Glitz ink. and accented everything with some Gold Stickles.
If that wasn’t bear-cuteness-overload for you, here is the new Bear Hugs die. The same adorable bear as “All Inside” but made bigger and with stitching holes so you can make your own felt plushie or other adorable projects!
Here is this new Favorite die of mine!

and here is a couple of plush ornaments I made with the die.

These cute bears were all made with scraps of fabric and felt that I had. Don’t limit yourself just to felt with this guy, That white fuzzy fabric was perfect for a white polar bear! I gave her a little MFT Snowflake to hold while the cozy little brown bear got dressed up with a scarf and a Starbucks gift card that I found in the shape of a leaf. How perfect was that! This die has started a felt stitching addiction in my house and I am hoping that Ellen carries more in the future!
Thanks so much for stopping by! I hope you were inspired to create some fun Bear projects! Next on the blog hop is the talented Nichol!
Here is the entire blog hop line up for Sunday 11/19/17
Karolyn Loncon
Brandi Kincaid
Sandy Allnock
Taniesa Vlasak <— You are here 🙂
Nichol Spohr
See you all again Soon!


Hi Friends!
Stopping in to share a super fast Halloween card that is sure to get a few giggles!
The Honey Bee Stamp set that I am using today is the Busy Bee’s Stamp set.  Disclaimer: Affiliate links are used in this post at no additional cost to you, Thank you for supporting my blog!
I also used the Bee stamp from the Bee-YOU-Tiful sentiment set and the “boo” letters came from the older Hand Lettered alpha alphabet which is now retired (but as I am writing this, it is still available in the honey bee stamps shop, HERE!)
Here is a close up look at today’s card.

This is a one layer card. To get the speech bubbles on either side of the card as well as the eyes, I used paper punches and masking paper. First I masked off the bee’s side and pressed the masks down where I would want them. Then I took Black Soot Distress Oxide ink and with a blending tool covered that section of the card completely. I did one full layer (then had to run one of the kids to their activity) then did a second layer. I noticed I got a really nice coverage this way.

I removed the existing masking paper and then stuck a strip of post it tape down the black side so that I could work on the light yellow shading of the bee’s side. I stamped three of the Busy Bees along with some bee-trail dots with Versafine onyx black ink (I forgot I was copic coloring at this point so if you color with alcohol ink you will want to use an alcohol safe black ink pad like Memento Tuxedo Black ink. If you color with watercolor or any other medium versafine is my go-to black ink)
I colored in my little bees with some copics in shades of Yellow and Neutral greys for the black of the bees. I used a little BG11 (Moon White) for the bottom of the wings and then coated all of the wings with the Nuvo Clear Glitter Gloss brush pen. This gave a subtle shimmer.

I placed the speech bubble mask down above the bees and with a finger dabber went around the bubble as well as around the white areas around the bees and card with the lightest shade in THIS ink pad (Ombre butter to orange by Hero Arts) Then I removed the mask and I stamped the word Bee from the Bee-YOU-Tiful stamp set using Nuvo Clear ink. To get the S i took THIS embossing pen and connected the S freehand. I embossed this with the Nuvo Gold Enchantment embossing powder. On the other side I stamped the BOO using the Hand lettered alpha in the same clear ink and embossed with WOW black glint glitter embossing powder.
I found that I got a few spots of stray embossing powder and a ink smudge. Rather than start the card over again I lightly sanded those spots using this Tombow Sanding Eraser and then if there were any marks leftover I covered it with my white gel pen.
You can stamp the inside of the card with “HAPPY HALLOWEEN” by using the Honey Bee Stamps “Hey, Pumpkin” stamp set
That’s it. This card is super simple and comes together in less than 10 minutes! I think it would be a fun card to use for breast cancer awareness month as well! I hope I was able to inspire you and give you a little giggle with my Boo Bees card today!
Thanks so much for stopping by!


Hi Friends!
This is one of two posts I have for you today! If you are looking for the KatScrappiness.com Blog hop Click —>HERE<— Affiliate links are included in this post where available at NO cost to you. Thank you so much for supporting this blog!
Happy World Cardmaking Day!
You should have arrived here from Nichol’s Blog! If you get lost you can always go back to the beginning —> HERE <—
I am so excited to be participating in a super fun blog hop featuring Chibitronics and Honey Bee Stamps!

Interactive cards are always fun but there is just something magical about a card that lights up. This fun card was inspired by my sweet Niece who has an adorable black Kitty named Oreo. I am going to send it to her with a few Halloween treats, I hope she loves it!
To start I took a piece of the brand new Hey, Pumpkin stamp set from Honey Bee Stamps and stamped it on some white cardstock with some Copic Safe ink. Then, I blended some distress oxide ink over the stamped image with Antique Linen, Fossilized Amber, Spiced Marmalade, Fired Brick, Seedless preserves, and Faded Jeans to get a setting sun/ twilight kind of look. On this same blended ink background, I extended the branches a bit of the stamped image trees and added dots of random fall copic marker colors to give the effect of leaves. I blended in some Vintage photo Distress Oxide ink below the trees over the stamped image.

Then I stamped the same image onto two more pieces of cardstock as well as stamped out the little witch hat as well. I colored the images with copic markers first and then did some further shading with my colored pencils. I used my Faber-Castell Polychromos colored pencils here but any brand would work well over copics.

I assembled and glued the colored and fussy cut pieces together and then glued the background piece and main image piece together. After the glue was completely dry, I took a sharp craft knife and cut a Jack-O-Lantern face into the pumpkin. I glued a scrap of heavy vellum behind the Jack-O-Lantern’s face so that it would defuse the lights a bit. I stamped a little leaf from the Honey Bee Stamps Seasonal Sweeties stamp set as well as the “Push Here” text using the KatScrappiness.com Interactive Card Instructions mini stamp set. Both were stamped using the Nuvo Clear Mark embossing ink pad and then heat embossed with WOW Rich Pale Gold embossing powder. I also stamped the You Are Purrfect in the same way and made a little flag banner that I glued to the top of the card panel. I placed two foam dots underneath so that it would stay with a rippled look.

With the card panel finished all that was left was Chibitronics fun! For the first time I used the Chibitronics effects stickers. I knew that I wanted to have the pumpkin appear to have a candle inside that flickers. It turned out that the Twinkle effect sticker mixed with one Yellow and one Orange LED sticker was the perfect combination. I took another piece of cardstock cut to the same size as my card panel and stamped the main image in exactly the same spot. I drew out where all my stickers would go as well as the copper tape. Once I had the tape down I used my teflon bone folder to really get the tape smooth and then put the stickers on top, also burnishing down the edges to get a really good contact. There wasn’t anything super special about this method and I simply followed THIS PRINTABLE that was available on the chibitronics website. I highly recommend practicing at least once with your circuit plan. Copper tape is really inexpensive (Check HERE for extra tape that is really reasonable) and worth practicing instead of doing it directly on your project first and not getting it right (Ask me how I know THAT one lol)


Once I was happy with how the layout of my Circuit was. I put a double layer of foam tape around my battery as well as the rest of the card. I did not cover the stickers at all with the foam tape however. Now my Jack-O-Lantern has a realistic candle lit glow. How fun is that! Check out the clip below to see it in action!

I hope you were inspired to light up some of your cards or projects! Your next stop on this bright blog hop adventure is the blog of Tiffany Au! If you get lost head on to the Honey Bee Stamps blog to see the full list!
Thanks for joining me on World Cardmaking Day! Be sure to comment on all of the blog posts for your chance to win a Honey Bee Stamps $25 gift certificate or a Chibitronics Starter Kit! Also, Honey Bee Stamps is having a 20% off sale TODAY 10/7/17 ONLY! Use Code WCMD20 at checkout! Now is a great time to stock up on your cardmaking essentials and pick up some new release stamp and dies too! Click —>HERE<— to shop now!

Hi Friends!
This is one of two blog posts for today.
If you are looking for the Blog Hop post that features Chibitronics and Honey Bee Stamps click —>HERE<—
Thank you so much for joining in on the World Cardmaking Day fun with KatScrappiness.com!
Today all of the designers are participating in a fun blog hop with their take on the first Kat Scrappiness Mood Board Challenge! There will be lots of prizes to be won and several chances to win. Make sure you comment on all the designers blog posts today for several chances to win and then make a card (or any project) inspired from our mood board and link up to the Kat Scrappiness blog before Monday October 9th for a chance at winning one of several prizes! Winners will be announced on that blog post Tuesday October 10th by Noon PST. Don’t forget you can get 15% off in the KatScrappiness.com shop today only! Use Code “IMAKECARDS” at checkout!
Here is the Mood Board that is apart of the challenge and what has inspired my project today!

And here is my card inspired by the images above:

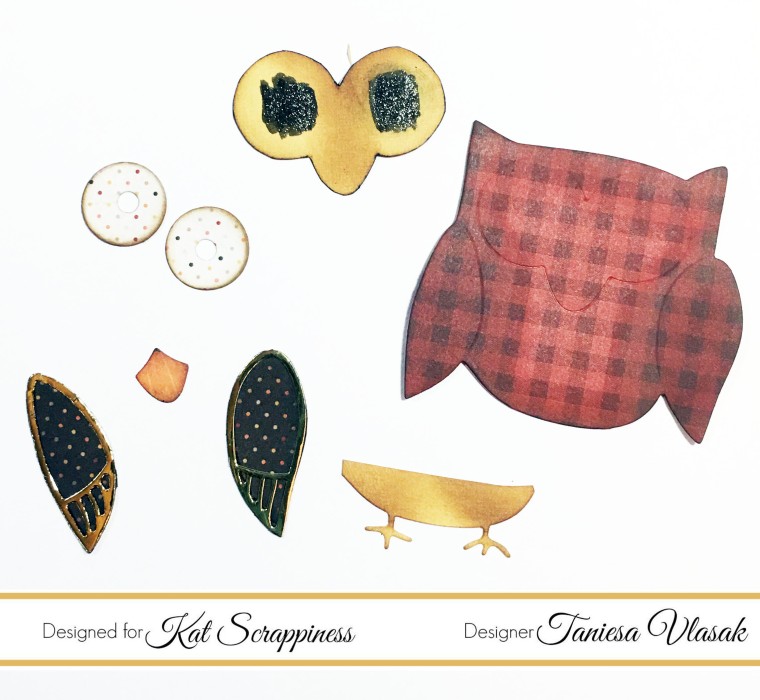
I just love the adorable layered owl die from Katscrappiness.com so I decided to gather some paper scraps I had leftover from the 6×6 paper collection “Hello Fall” By echo park. I absolutely love these patterned papers and it fit so well with today’s challenge!
I added some Distress oxide ink for added dimension as well as some eyebrows with a black marker. I also darkened the center of the eyes with a black glitter pen. Then I pieced everything together for the little owl.
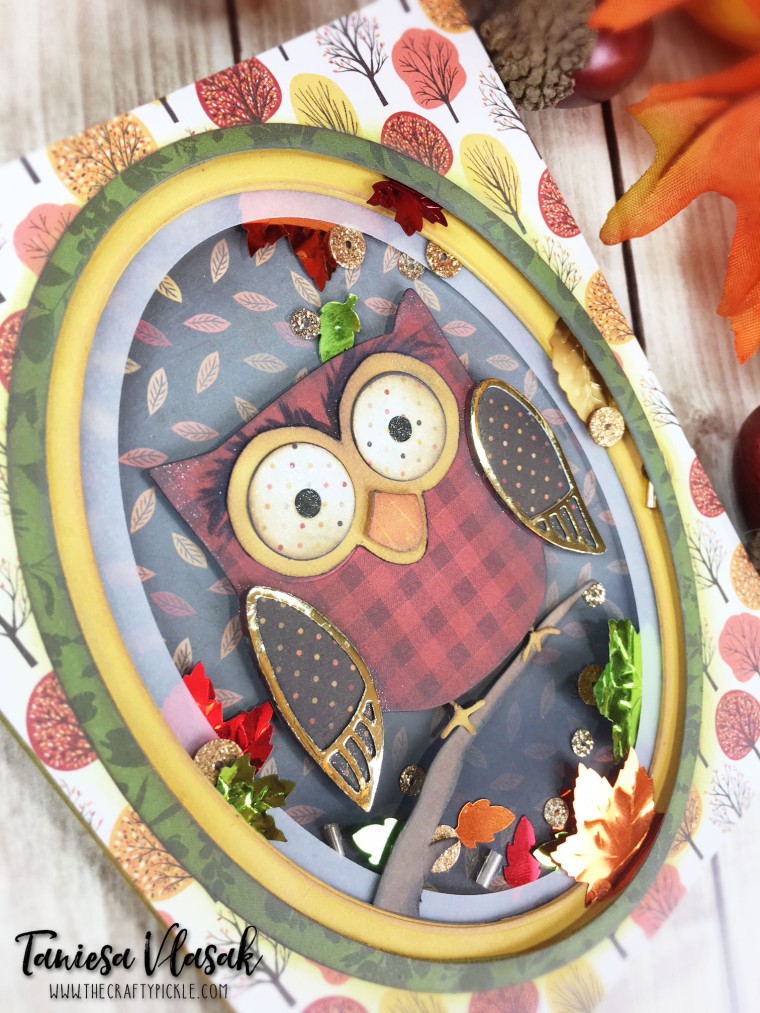
I took several pieces of patterned paper and a piece of vellum and cut different size Ovals from the Kat Scrappiness Never ending Oval die set and layered them together with a mix of doubled up thick cardstock spacers or foam tape in between. This allowed room to place little leaves and sequins in between the layers as well as a hand cut branch that I colored with Distress oxide ink.

I hope you have been inspired by my little owl card today! Below is the list of all the designers participating in the blog hop, Make sure you stop by and see what project(s) they have to inspire you today!
Kat Scrappiness Designers (Blog Hop Links)
To go to the Kat Scrappiness Shop Click HERE and save 15% off your total purchase today (10/7/17) only! To go to the Mood Board Challenge blog post click HERE and enter your card for a chance to win fabulous prizes!

Thanks for stopping by… Happy World CARDMAKING Day!

Hi Friends!
Happy first day of October! It’s time for cozy sweaters and all things Pumpkin…. but also it is time for breast cancer awareness.

As you may have seen before, Ellen Hutson has an exclusive Courage stamp and die set that helps in the fundraising efforts to find a cure for breast cancer. Aside from the stamp set being absolutely beautiful, $25 of every stamp/die set combo purchased gets donated to the Breast Cancer Research Foundation. If you don’t already have this gorgeous set I encourage you to get one before they are gone for good.

(affiliate links used where available at no cost to you. Thank you for supporting my blog)
Today the Ellen Hutson design team and friends are gathering together as a little surprise for the wonderful women who have committed so much time and effort into this stamp and die set and who have personally been affected by this horrible disease. I am honored to be among some of the most talented designers in today’s blog hop. If you have missed any of their post you can find the blog hop list at the bottom of this post Or start from the beginning at the Ellen Hutson Classroom.
I have two cards to share. This first card uses the Courage stamp set as well as the Essentials by Ellen Bohemian garden stamp set. I thought that the Flowers in both sets paired nicely with each other.

I Stamped various flowers from both stamp sets using different colors of Distress Oxide inks. Then I misted the entire panel with water and let dry. I repeated this about 4 times with different layers. Once the florals were done I added a bit of texture with a script stamp from Penny Black.

I stamped the Courage sentiment from the stamp set in versafine onyx black ink and once dry I misted the card with sheer shimmer spray which you can sort of see in the photo but in person, it’s just the right amount of shimmer. I added some sparkling clear sequins and then mounted on a piece of pink cardstock then to my white card base. This card was inspired by a video I watched by Julie Ebersol using the Courage stamp set. you can see that Video HERE.
The next card I have uses the Essentials by ellen bed of roses die and the Courage stamp and die set.
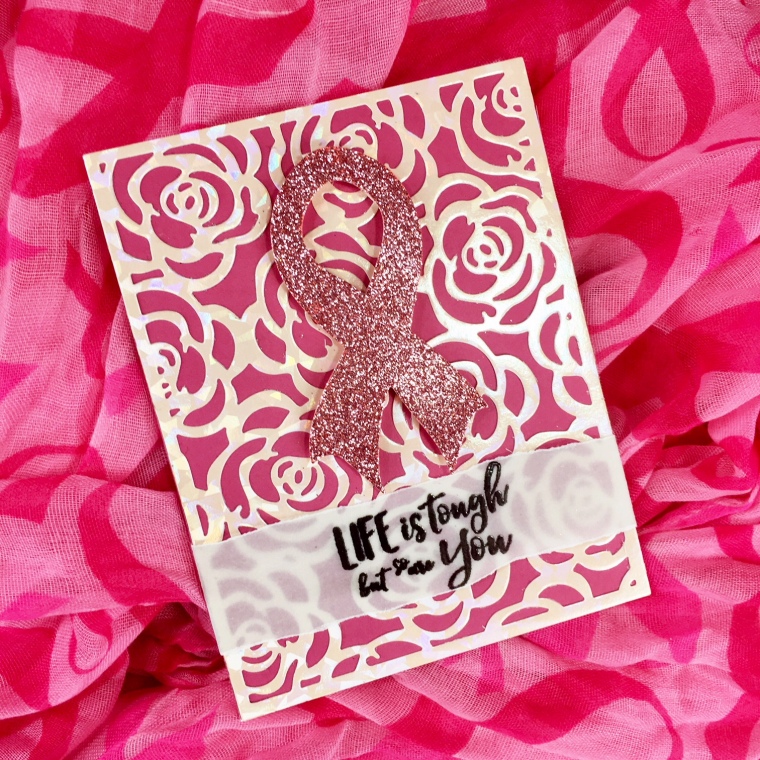
I cut the rose panel out of some shiny shimmery pink cardstock and mounted that on a piece of dark pink cardstock. I took the ribbon die and cut that out of some DCWV pink glitter paper and attached that to the rose panel with some foam tape.

For the vellum sentiment strip I used some Essentials by Ellen heavyweight vellum and stamped the sentiment with versafine Onyx black ink. I sprinkled some clear embossing powder on top and heat set. The torn vellum strip is folded and glued down on the back side of the card base. Once completed I added the panel to a white card base.

I hope you enjoyed my cards for today and got plenty of inspiration from everyone participating in the blog hop! For a closer look at the Courage stamp set, click HERE to take you to the Ellen Hutson store.
I am the last stop on the Hop for Hope but if you missed anyone you can see the full list of participants below.


Hi Everyone!
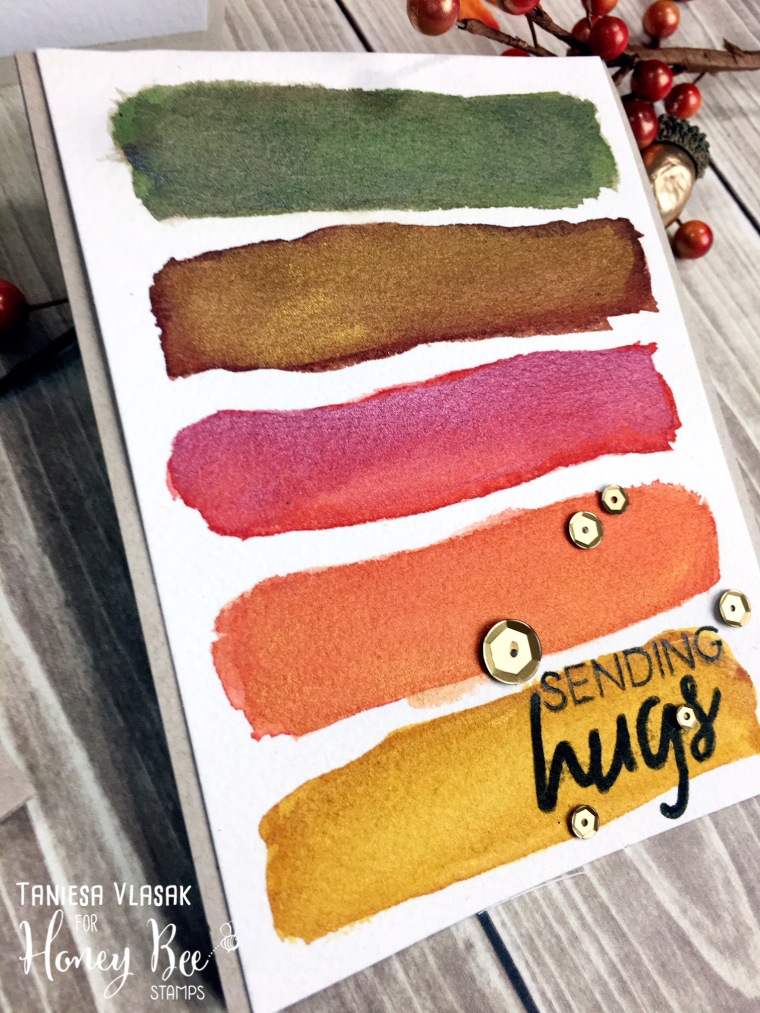
I am quickly stopping by to share a few cards I made using the Honey Bee Stamps and Simon Says Stamp Stamptember Collaboration set: Remarkable YOU!
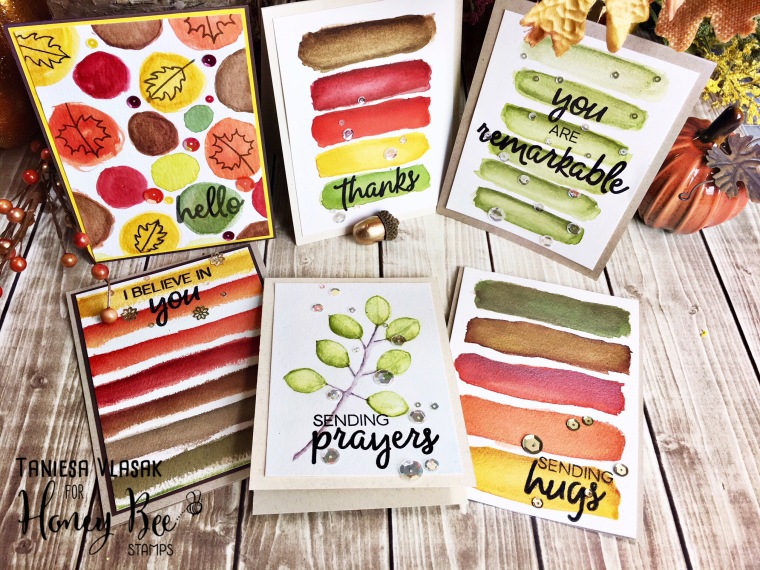
All of the cards are hand painted using Daniel Smith Watercolors which are now available at Simon Says Stamp and I stamped the sentiments using the new Remarkable you stamp set. There is also a die set available and you can find that HERE. (affiliate links used where available at no charge to you)
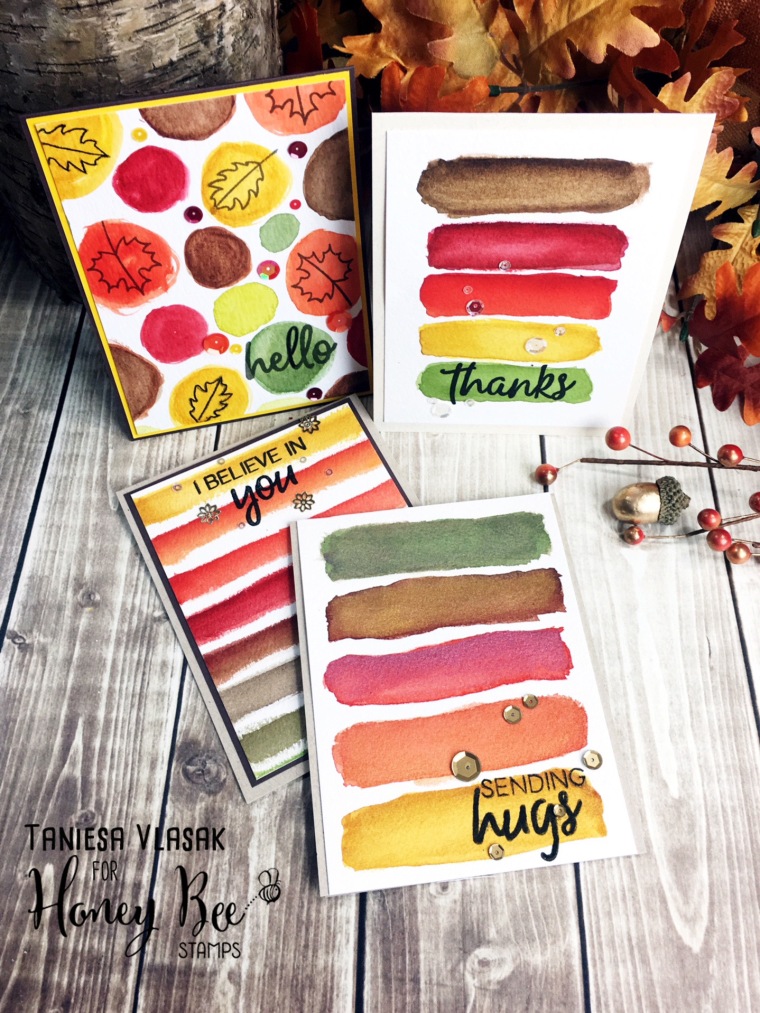
For the card with the painted spots I used some of the Leaf stamps that are in the new Honey Bee Stamps Bushel and a Peck stamp set. You can find this at Simon Says Stamp or in the Honey Bee Stamps shop HERE.
On the card above I used some shimmery watercolor over my watercolor painting… the fine tec rainbow and gold pallets are my favorites! Check them all out HERE.

I love the soft green of these cards. I used the leaf again from Honey Bee Stamps Bushel and a peck stamp set to create the stem.
Thank you so much for stopping by! Make sure you check out all of the Stamptember items in the Simon Says Stamp shop HERE.
Have a great weekend!

Hi Crafty Friends!!
The Honey Bee Stamps Fall Release is finally here and available in the Honey Bee Stamps shop HERE. There is a wonderful selection of products to celebrate the fall season.
I have just a couple of cards to share today but I will be sharing more throughout the season!

I have been spending a lot of time away from home lately, and while it is hard to carry lots of supplies I stamped a bunch of impressions from the Gather together stamp set onto a bunch of patterned papers I had in my supply stash. I love this cute bunch of critters.

Sometimes I am in the mood to just cut paper… fussy cutting is not always my favorite but perfect for on the go. Instead of coloring the images I “colored” all of the bits and pieces by using different patterns of paper. This adds a lot of texture and interest to the card I think. After I cut these pieces I would glue them to a piece of cardstock I did some ink blending with and I used the stamped impression as a guide to lay the pieces in place.


Next card is so super simple and quick.

I found this cute piece of paper in one of my 6×6 patterned paper pads. I cut it down to an A-2 size and stamped HELLO (from the Gather Together stamp set) in the right hand corner. I added more patterned paper behind and a little sparkle too by using my glitter pen and some brand new sequins in the Honey Bee shop that you can find HERE.

Thank you so much for stopping by my blog. To see ALL of the new products from Honey Bee Stamps, Click HERE (affiliate link used at no additional cost to you, thank you for supporting this blog!)
Be sure to visit each blog & leave a comment… Honey Bee Stamps is giving away TWO $50 gift cards to the Honey Bee Stamps store!
Winners will be posted on the Honey Bee Stamps blog Monday, September 25th!
Here is the Blog Hop lineup:
Have a wonderful weekend!


Hi Everyone!
Welcome to the Honey Bee Stamps and Ellen Hutson SUNSHINE blog hop! You should have arrived here from the blog of the lovely, Nichol. If you are starting the hop on my blog be sure to go to the Honey Bee Stamps blog or Ellen Hutson Classroom to hop along from the beginning!
Make sure you read all the way through for details on how you could win one of two $30 gift certificates to Ellen Hutson!
I have absolutely fallen in love with the Sending Sunshine stamp and die set designed by Honey Bee Stamps for Ellen Hutson, as well as some coordinating items from Honey Bee stamps! I created quite a few cards using this new release in no time at all. Let me show you a few.
First is a fun ” You are my sunshine” this card features a shaker sun center using the Honey Bee Stamps Partly Cloudy die set and the new Sunny Day sequins mix. The small frame around the sun circle made this shaker come together quickly. (Affiliate links used where available at no cost to you, thank you for supporting this blog)

The fun thing about this card is that the sun rays actually spin!

I assembled the layers using a paper fastener (aka brad) which allows the top two layers to spin around. My daughter who loves her fidget spinner, loved playing with this card and I think it would be great for any tween or teen!

Stamps are from Sending Sunshine stamp set as well as the Ray of sunshine stamp.

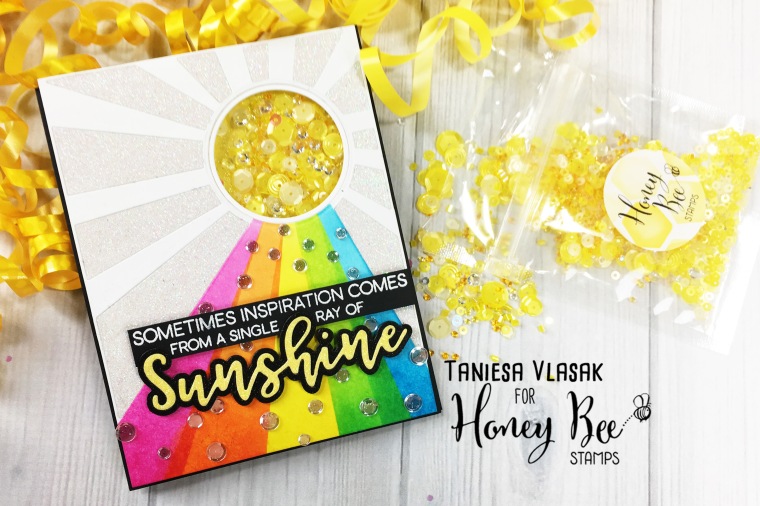
Next card is a simple ink blended rainbow for an inspirational ray of sunshine!
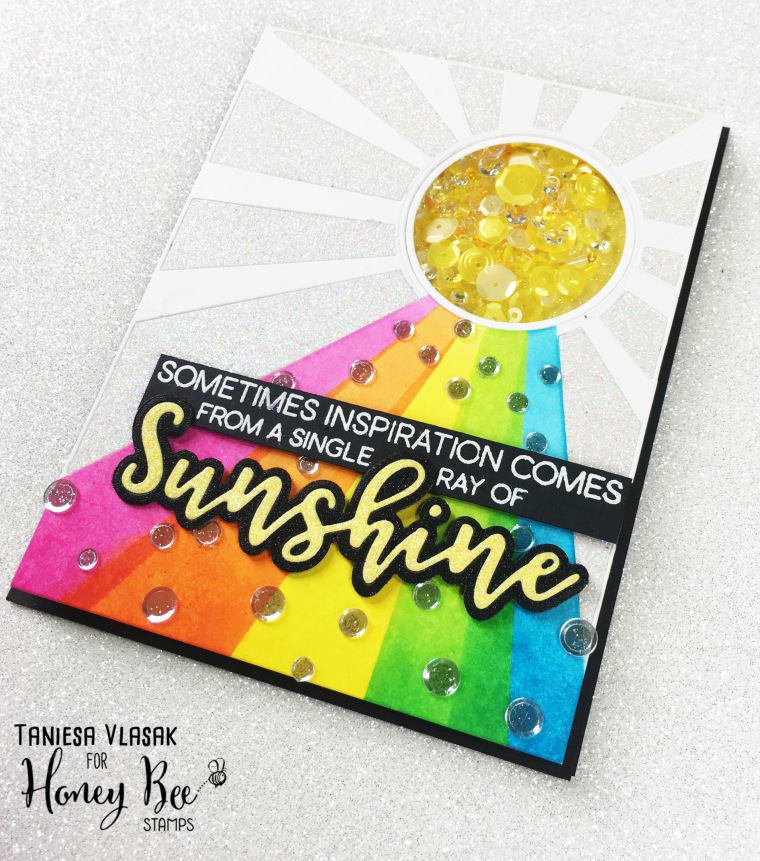
First, I created a shaker card using foam and the a-2 sunburst cover plate die. I added my Sunny day sequins to the center and then covered with acetate. I cut the A-2 cover plate from glitter and white cardstock. For the white piece I taped off sections and used my distress inks to build a rainbow from the center of the sun. once that was done I layered that over the shaker foam layer and then pieced in the glitter rays. I stamped and embossed the sentiment from the Ray of sunshine stamp set. I did some simple die cut inlay for the “sunshine” word. both from glitter cardstock. To finish it off I added some Bokeh lights confetti with my Silver Moondust Nuvo glitter drops. I love how you can see a bit of sparkle though the confetti.


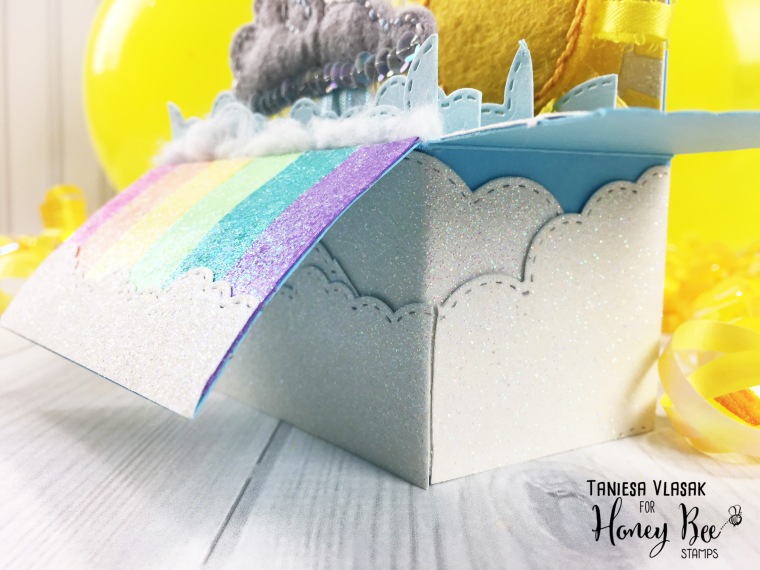
The last card I have for you is one that takes a bit of time but can be well worth the time spent. This is a pop up box card with a little handmade gift included too!

To make the box I followed THIS tutorial which was super easy! I covered the front flap with strips of colored cardstock and then trimmed away any excess. I took some Nuvo Moonstone glimmer paste and spread a thin layer over all the cardstock strips and let try. Once the glitter was dry I cut a cloud border using the Honey Bee Stamps cloud border dies and glued to the bottom of the rainbow. I cut this from white glitter cardstock and I also cut pieces to go around the outside of the box. the inside of the box has 4 layers and in between the front flap and the first layer I attached a bit of cotton to give a fluffy cloud look.
The back panel of the box card is the sunburst cover plate die cut pieces together and glued on that back piece. This gave the box extra stability too. I set the almost finished box aside and went to work on some cute planner clips for a friend who loves to decorate in her planner.
I cut felt pieces from the partly cloudy die set… the sun as well as the largest cloud in the set. I cut three pieces of each. I glued the ribbon on one layer and then once dry I sandwiched the other two pieces around the ribbon covered pieces and hand stitched them together. I am not the best when it comes to stitching and sewing but it was a lot of fun to make. I did sew the large paper clip to the middle layers before stitching all the way closed.
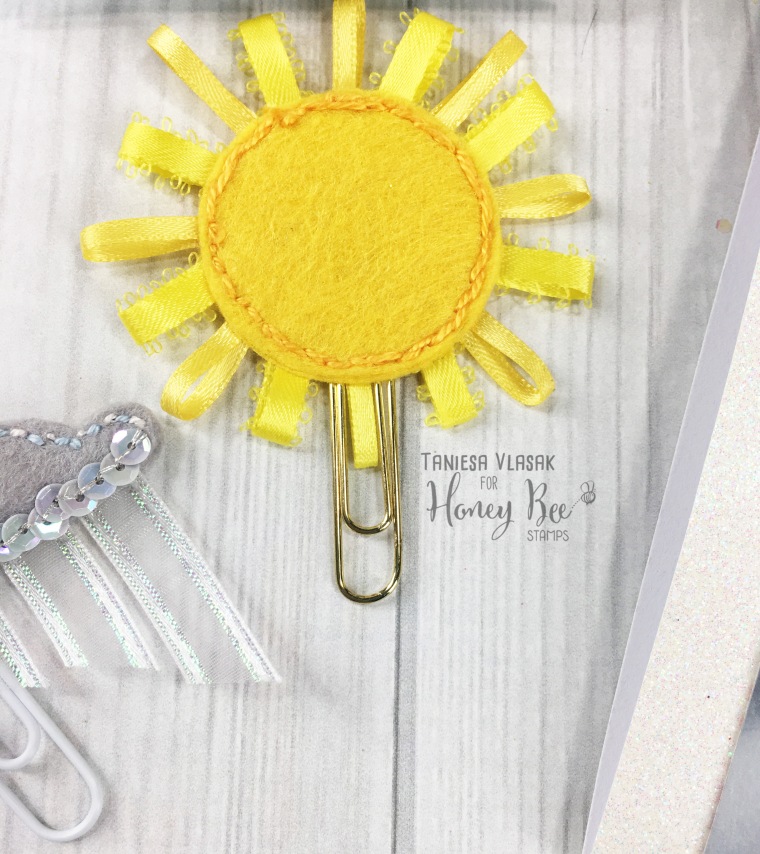

I added a row of sequins along the bottom of the cloud, each by hand, from the Honey Bee Stamps cloudy day sequins mix.
once finished I clipped these both into the layers of the box card.


Because this can be quite bulky I thought about making a band of sorts to go around the closed box for mailing. I took a piece of 12×12 cardstock and wrapped it around the box to make sure it fit ok and then using a heavy-duty tape I glued the two ends together.
To decorate the band I stamped a sentiment using the Sending Sunshine stamp set, Ray of sunshine stamp, The happiness stamp set and the simple sentiments stamp set. I also cut a cloud using the stitched cloud border dies and The sun is just from a circle die cut.


It was a really fun gift to put together. I am already thinking of more things I can do with the box card idea not to mention more fun felt paper clips!

That is all for today. Thank you so much for stopping by to view my projects. I hope you found them inspiring. To win one of two $30 gift certificates to Ellen Hutson, simply just comment below on this post and the other designers in the blog hop as well. I am the last stop in the blog hop but if you missed anyone don’t worry, you can head HERE to the honey bee stamps blog and get the entire line up.
If you missed my video highlighting all of the great new Sending Sunshine products you can check out that post HERE and watch my video showing all the products mentioned today and more.
Supplies used are listed below (affiliate links where available at no cost to you)
Shop All the products mentioned in this post at:
Honey Bee Stamps or Ellen Hutson LLC
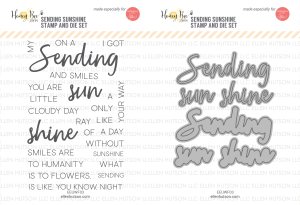
Sending Sunshine Stamp set

Ray of Sunshine

Sunburst A-2 Coverplate die and Stencils

Stitched Cloud Border dies and Partly Cloudy die set

NEW Buzz word dies (Sparkle, Ampersand, Shine, and Bright)

Honey Bee Stamps SUNSHINE bundle
Ellen Hutson exclusive bundle only
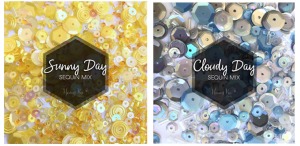
Sunny Day and Cloudy Day sequin mix
Other Supplies:

Hello Friends!!
I am so excited that I get to introduce new products from Honey bee stamps including an exclusive stamp set for Ellen Hutson! take a look at my video and then you will also see still shots and links to both shops to purchase these products (some products only available at the Honey bee stamps shop. Affiliate links are used where available at NO cost to you. Thank you for supporting my blog!)
The new United we Flourish stamp and die set is designed by Honey Bee Stamps exclusively for Ellen Hutson and can be seen below.

And here is my video showing the stamp and die set with some other great Honey Bee Stamps coordinating products!
You will find links to the new and related products below! I will be sharing lots of projects all week-long on Instagram and on Thursday I will show them all on my blog.
Here is the complete list of new and supporting products from Honey Bee Stamps available NOW!

Sending Sunshine EXCLUSIVE stamp and die set.

Ray of Sunshine Stamp and matching die (sold separately).

Four new BUZZ word die sets: Sparkle, Ampersand, Shine, and Bright.

Cloud border dies and Partly Cloudy die set.

A-2 Sunburst cover plate and Sunburst stencil set of three.

Sunny Day Sequins mix and Cloudy Day sequins mix.
(only available at Honey Bee Stamps)
Ellen Hutson has a Sunshine bundle of products available with the products show above. You can view that bundle by clicking HERE .
To see all other Honey Bee Stamps products click HERE and to see Honey Bee Stamps products in the Ellen Hutson store click HERE!

Make sure to follow me on Instagram HERE so you can see lots of project sneak peeks starting tomorrow!
See you soon for more fun in the SUN!
